Tutorials | Colour Toning
What we're trying to do here take a colour or mono image and give it a colour toning. This can work particularly well for a sepia effect.
I know you can produce this effect, for sepia, by using the colour filters in Photoshop. However I personally don't like the results produced. This tutorial is simply provided as an illustration of an alternative method.
Steps
Firstly, load your image and either flatten it or stamp the visible layers to a new layer.
 |
There are a number of different ways you can convert an image to a mono.
The example shown here is using the channel mixer. Choose any you prefer. At this point though, make sure there isn't too much contrast in your image. One of the later steps naturally adds contrast so beware. You can obviously skip this step if your image is already mono. |
 |
This, at first will look very over the top. Don't worry about it. We will chill it out a bit later. For now, add a colour balance you are happy with. The settings shown are heading towards a sepia effect. This will create a colour balance layer with an empty mask. |
 |
This is about applying the colour balance layer to a selected channel of our image. I.E. red, green or blue - the one you want as the basis for your colour. You'll select the channel you used in your colour balance. For example, a sepia I'd select the red channel. You can also change the channel later if you don't like how things turn out. Make sure you've selected the mask on the colour balance layer and press: -
Make sure your foreground and background colour swatches are at their default (press D) with black as the foreground, press alt+delete That should then give you a mask as you see on the left. What this does is only apply the colour balance to the parts of the mask that are not black. The nearer they are to white, the more the colour balance effect is applied. |
  |
We're now going to add a curves layer the same way we did the colour balance. You adjust each of the channels separately. Start with Red. Add a curve as you see fit - you are in effect emulating the colour balance settings. You don't have to be exact. Just adjust to taste. |
We could switch off the Colour Balance layer and perform step 2 again however there is a quicker way.
Simply press and hold the alt key and drag the colour balance mask to the Curves mask.
You will be asked if you want to replace the existing mask. Say yes.
 |
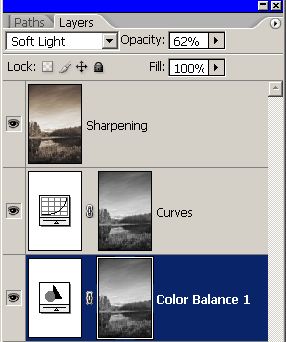
Switch the Curves layer blend mode to Soft Light. This will remove a lot of the strong colour you see and will also add an amount of contrast. |
 |
If you ignore the sharpening layer you'll notice the other layers - Curves, Colour Balance and Mono. For both the Curves and Colour Balance, adjust the opacity slider until you're happy with the final effect. Now, start again with the sepia filter and compare the two results. I'm sure you'll agree this method leads to much nicer tones throughout your image. |
Below you will see three versions of the same image. The first is the original, the second a sepia effect and the third a blue tone. Whatever colour you want or need will depend on your own tastes.
|
|
| Loch Lubhair - Original |
|---|
|
|
| Loch Lubhair - Sepia |
|---|
|
|
| Loch Lubhair - Blue |
|---|
Examples using this Colour Toning tutorial
Good luck, have fun.
Neil.


